 This can be quite important feature, if you care about it....Changing the width of your Blogger Blog will gain you some extra space (to place more gadgets, pics, ads...), or it will make your Post section wider (meaning: larger pictures, wider paragraphs), you can also add a third column, if you want.....
CURRENT SITUATION (What's out there?)
There's a thousands of templates out there...you have Blogger default templates + Dozens of other sites that provide a free Blogger Templates...
All right, you knew that....but here's another thing you should consider:
There are 2 kinds of templates (layouts) you can use:
► FLUID width or STRETCH templates - template that resizes to fit any computer monitor. It stretches corresponding to the monitor resolution.
Advantage is obvious, and a big disadvantage is DESIGN. It's quite restraining when it comes to this. Of course, it depends what you like. For a professional looking template, it's great....But for a personal one, it can be a bit dull.....
► FIXED WIDTH templates - they have a fixed width, regardless of monitor resolution....They are ideal for designing and customizing, but, the width part can sometimes be a real pain in the....:]
...Why? Because:
- people have different Monitor (screen) sizes,
- and they use different resolutions on them...
...the final result is: Blog appears different in each combination!
 Read more about Monitor sizes and resolution, and how to change the resolution...
◄Imagine lying down in the grass with your nose pressed deep into the thatch. Your field of vision would not be very large, and all you would see are a few big blades of grass, some grains of dirt, and maybe an ant or two. This is a 14-inch 640 x 480 monitor. Now, get up on your hands and knees, and your field of vision will improve considerably: you'll see a lot more grass. This is a 15-inch 800 x 640 monitor. For a 1280 x 1024 perspective (on a 19-inch monitor), stand up and look at the ground. Some monitors can handle higher resolutions such as 1600 x 1200 or even 1920 x 1440—somewhat akin to a view from up in a tree...►
SHOULD I CHANGE THE WIDTH OF MY BLOG?
Well, it depends. If you already have a wide template, or you're using Stretch (fluid) layout, there's no need of doing this...
Resolution friendly means that your Blog doesn't exceed the width of 750px. Why 750? Because statistics tells us that lots of people are still using a 800x600 px resolution. And if you make your Blog wider than 750, these group of people will have to scroll left-right on your page....which is quite irritating. And you can lose those visitors....
But, there's also a saying, and it goes like this:
Lie ► A Bigger Lie ► Statistics.
If you surf a bit, and pay attention to web pages width, you'll notice that lots of web sites (even popular ones), are way over the 750 px!
So, it's really up to you....
LET'S CHANGE THAT WIDTH ALREADY.....
The only problem here will be the identification of the CSS style in your template (Layout). This is the part in the code section that defines styling, including width of elements.
There's so many different templates around, and it's a different story for each one...
But don't worry....there's a pattern. A backbone. A Layout constitution. A certain way of organizing (naming) elements. It's basically the same thing, under the different name.....
For this example, we'll take a default Blogger template ► Minima. Let's do it.
 1. First thing is identification. Go to: LAYOUT ► EDIT HTML, and find the parts that defines the width of the Main section, Post sections, Sidebar, Header Section and Footer.
For Minima, we have this situation:
#header-wrapper {
width:660px;
margin:0 auto 10px;
border:1px solid $bordercolor;
}
..................................
#outer-wrapper {
width: 660px;
margin:0 auto;
padding:10px;
text-align:$startSide;
font: $bodyfont;
}
..................................
#main-wrapper {
width: 410px;
float: $startSide;
..................................
#sidebar-wrapper {
width: 220px; float: $endSide;
..................................
#footer {
width:660px;
clear:both;
width:660px;
margin:0 auto 10px;
border:1px solid $bordercolor;
}
..................................
#outer-wrapper {
width: 660px;
margin:0 auto;
padding:10px;
text-align:$startSide;
font: $bodyfont;
}
..................................
#main-wrapper {
width: 410px;
float: $startSide;
..................................
#sidebar-wrapper {
width: 220px; float: $endSide;
..................................
#footer {
width:660px;
clear:both;
► header-wrapper is Header
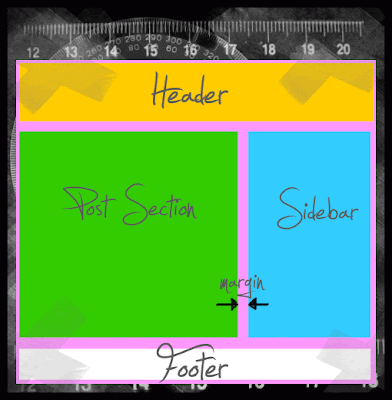
► outer-wrapper is our Main section, other elements are wrapped inside of it..
► main-wrapper represents Post Section
► sidebar-wrapper stands for Sidebar
► footer is Footer :]
...this means that our header-wrapper is 660px wide, outer-wrapper width (Post section + Sidebar+ margins) is also 660px, and footer 660 px.
2. Let's change the width:
#header-wrapper {
width:750px;
margin:0 auto 10px;
border:1px solid $bordercolor;
}
......................................................................
#outer-wrapper {
width: 750px;
margin:0 auto;
padding:10px;
text-align:$startSide;
font: $bodyfont;
}
.......................................................................
#main-wrapper {
width: 500px;
float: $startSide;
........................................................................
#sidebar-wrapper {
width: 220px;
float: $endSide;
........................................................................
#footer {
width:750px;
clear:both;
width:750px;
margin:0 auto 10px;
border:1px solid $bordercolor;
}
......................................................................
#outer-wrapper {
width: 750px;
margin:0 auto;
padding:10px;
text-align:$startSide;
font: $bodyfont;
}
.......................................................................
#main-wrapper {
width: 500px;
float: $startSide;
........................................................................
#sidebar-wrapper {
width: 220px;
float: $endSide;
........................................................................
#footer {
width:750px;
clear:both;
◄ If you want to increase the width of your Posts section or Sidebar, you HAVE to increase your Main section width (outer-wrapper) for the same value! ►
◄ 500px + 220px + margins = 750px ►
In this example, I've increased my Post section (main-wrapper) for 90px, so I've changed 410px into 500px. I did the same for the Main section (outer-wrapper), changed 660px into 750px....I've left the Sidebar the same width, 220px.
I've also changed the width for my header-wrapper and footer....into 750px. Note that this is not necessary, but better do it...for the sake of symmetry in your Layout...
That's about it. Remember, when you're changing the width of your (custom) Blogger template, certain elements will be (can be) under different name....Do not let it confuse you! You know how the elements are organized inside of it....and in the end, its a 5 minutes job...some simple mathematics + patience.....
If you need any help, ask.....

0 ความคิดเห็น:
Post a Comment