Automatic Count and Vote Button
Before you do that though, you would want to take note of the following:-
1. Your blog should be set to save Post Pages. Post Pages are archived blog posts published to their own web page. Each post will have a unique URL, which is required by Digg for the individual posts to be submitted. To verify or enable it, login to your Blogger Dashboard. Under Settings-> Archiving, set the “Enable Post Pages?” to “Yes” and save the settings.
2. This template hack will put a Digg button to every post. You are therefore not able to choose which post you want to include or exclude a button. If you would prefer to have a Digg button added only to some posts, read the later part of this article on “Button for selective posts.”
3. The code reads the URL of the individual blog page and this shall be the URL used for submission of the story to Digg.
Under “Template”, click the “Edit HTML” tab. Block copy the entire HTML code for your site and save it in a text file. You can also click the "Download Template" link. This is one of the two necessary steps whenever you want to change the template. The second step is of course to “Preview” the new changes, and save the changes only when you are satisfied. The backup you have saved in a text file will come in handy when you accidentally click to save the changes without previewing them. With a backup, you can easily restore the template to the prior state if need be.

Click the box next to “Expand Widget Templates”. Scroll about two-thirds down the template to look for the code that reads:-
<p><data:post.body/></p>
If you want the button to show at the top right corner of your post, replace the above code with this.
<div style='float:right; margin-left:10px;'>
<script type='text/javascript'>
digg_url="<data:post.url/>";
</script>
<script src='http://digg.com/tools/diggthis.js' type='text/javascript'/>
</div>
<p><data:post.body/></p>
This is what you get:-
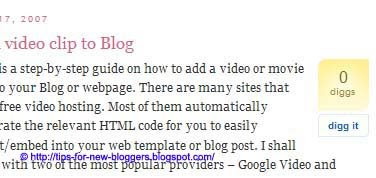
If you would like the button to appear at the end of your post, replace with this following code instead.
<p><data:post.body/></p>
<div style='float:right; margin-left:10px;'>
<script type='text/javascript'>
digg_url="<data:post.url/>";
</script>
<script src='http://digg.com/tools/diggthis.js' type='text/javascript'/>
</div>
The result will be this:-
If you want to have the button at the top left corner of your post, change the alignment.
<div style='float:left; margin-right:10px;'>
<script type='text/javascript'>
digg_url="<data:post.url/>";
</script>
<script src='http://digg.com/tools/diggthis.js' type='text/javascript'/>
</div>
<p><data:post.body/></p>
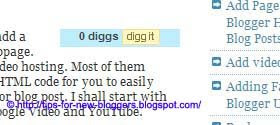
The outcome is this:-

Digg has another compact button. If you insert this code:-
<div style='float:right; margin-left:10px;'>
<script type='text/javascript'>
digg_url="<data:post.url/>";
digg_skin="compact";
</script>
<script src='http://digg.com/tools/diggthis.js' type='text/javascript'/>
</div>
<p><data:post.body/></p>
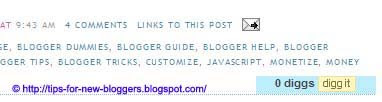
You will see a compact Digg count button like this:-
You can also change the background color of the button to blend with your site. For example, a code like this:-
<div style='float:right; margin-left:10px;'>
<script type='text/javascript'>
digg_url="<data:post.url/>";
digg_bgcolor="#BDEDFF";
digg_skin="compact";
</script>
<script src='http://digg.com/tools/diggthis.js' type='text/javascript'/>
</div>
<p><data:post.body/></p>
will give you this:-
You can insert the color code of your choice into the red portion. For a list of color values to insert, you may refer to the Hexadecimal HTML color code list.
Automatic Count Button in Blog Footer
[Update] This segment is added in response to user's request to have the Digg button in the Blog footer, i.e., after the labels. If you scroll through your template, you will see this chunk of code which gives the labels in your Blog footer.
<p class='post-footer-line post-footer-line-2'>
<span class='post-labels'>
<b:if cond='data:post.labels'>
<data:postLabelsLabel/>
<b:loop values='data:post.labels' var='label'>
<a expr:href='data:label.url' rel='tag'><data:label.name/></a><b:if cond='data:label.isLast != "true"'>,</b:if>
</b:loop>
</b:if>
</span>
</p>
If you want a Digg button to appear just after the labels, add the appropriate Digg button code right after the above code. For example, if you want the compact Digg button, add this code below the labels code:-
<div style='float:right; margin-left:10px;'>
<script type='text/javascript'>
digg_url="<data:post.url/>";
digg_skin="compact";
</script>
<script src='http://digg.com/tools/diggthis.js' type='text/javascript'/>
</div>
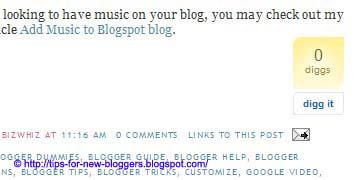
The resulting layout is this:-
Move the Digg button code above the labels if you'd like. Experiment a little. Just remember to preview the template and not to save it unless you are satisfied.
Digg Button in Blog Footer
If you do not want to see an Automatic Count button, you can also place a link button into the template. This button will appear at the bottom right corner of every post and readers can click it to submit that post to Digg.
Scroll to this part of the template and insert the lines (in red):-
<div class='post-body'>
<p><data:post.body/></p>
<div style='clear: both;'/> <!-- clear for photos floats -->
</div>
<div style="float:right; margin-left:10px;">
<a expr:href='"http://digg.com/submit?phase=2&url=" +
data:post.url + "&title=" + data:post.title'
target='_blank'><img border="0" alt="Digg this" src="http://digg.com/img/badges/91x17-digg-button.gif"/></a></div>
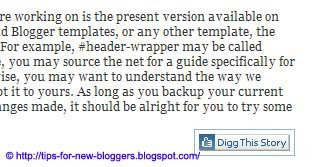
With the code, this is what you will see at the end of every post.
You can change the position of this button. Go through what we discussed earlier in this article to understand where to place the code if you should want the button to be at the top of the article.
The button 91x17-digg-button.gif is simply an example. As the following section explains, there are many buttons you can use. To change the button to another design, replace the image URL with that of the new button.
Button for selective posts
The methods of manually adding a Digg button to selective posts are rather tedious and complicated. The problem is that Blogger does not allow you to simply insert a JavaScript into a blog post. Since this blog is targeted at the majority of us who are not computer experts, I shall suggest a method that I think is simple enough for us.
First, go to the Digg tools site to select a Digg button that you like. You will see a wide selection of Digg buttons.


Take note of the image URL. For example, the image URL of this button
 is
ishttp://digg.com/img/badges/91x17-digg-button.gif
Write a post and publish it. Next, refresh the page and click on the title of your post. This will bring you to the post page. Take note of the new URL of your story. Insert it into the red portion of this HTML code. If you want a different image, insert the image URL into the blue portion of the code.
<a href="http://digg.com/submit?phase=2&url=URLofyourstory" target="_blank"><img border="0" alt="Digg my article" src="http://digg.com/img/badges/91x17-digg-button.gif"/></a>
Now, go back to your article and Edit it. Choose the “Edit HTML” mode and not “Compose” mode. Copy the above code and paste it into whichever part of your blog article. “Preview” it, and if you are happy with it, “Publish” it.
For this article, I have manually inserted the Digg button. If you would like to Digg this article, or just to see how it works, click this button.


0 ความคิดเห็น:
Post a Comment